xSeries EXP400 External Storage
Several older IBM xSeries servers such as the x336 shipped with obscure 2.5" (SFF) U320 Parallel SCSI disk drives. IBM saw that SFF drives were the way of the future, but wagered on the wrong interface. While other manufacturers (as well as IBM) moved toward SAS 2.5" disks, early IBM servers with 2.5" drive bays continued to use parallel SCSI backplanes. The maximum capacity drive manufactured for these servers was 73GB. Customers often outgrow the ~200GB maximum storage space attained with these drives. Inadvertently, they buy 3.5" 300GB 10K U320 SCSI drives (IBM Option 40K1025) since they are listed in IBM's options catalog right next to the SFF drives. These drives will not fit in a server equipped with a 2.5" SFF drive cage. However, the drives can still be used. This guide will show you how to install the 3.5" SCSI drives into a low-cost EXP400 disk enclosure.
x336 External Expansion Requirements
-IBM ServeRAID Controller controller with external U320 Ports (ServeRAID 6M)
-Free PCI-X (Full Length) Slot
-(1) or (2) VHDCI to VHDCI 68-PIN SCSI Cable(s)
-IBM EXP400 Expansion Array and Rails
Considerations
The EXP400 supports up to 14 drives and two host connections. It can be configured with (1) or (2) ESM cards. A single ESM card can talk to all 14 drives, or be configured to only see 7 drives in split bus mode. Switch 1 on jumper block SW4 (circled in red below) controls the bus mode. 0 is single bus mode. 1 (on) is dual / split bus mode.
Single Server, Single ESM
Set the ESM to full-bus mode (so it can see all 14 drive slots.)

Single Server, Dual ESM
Set ESMs to split bus mode and cable each ESM to a separate SCSI channel on the ServeRAID. You can load balance LUNs now.
Two Servers, Dual ESM
Set the ESM's to full-bus mode if the servers are clustered and need access to the same storage (for example, a Microsoft Failover Cluster.) Set the ESM's to split bus mode if each server needs separate storage, invisible to its partner. Each server will see 7 drives (slots 0-6, or 7-14.) Cable one ESM to server 1, and the other to server 2 in both cases.
Setup
Ensure you have good backups of your existing RAID. While your internal RAID and external RAID can happily coexist, they will likely use the same driver and management software (ServeRAID manager.) Incorrectly installing drivers or clicking the wrong drive sets in the RAID configuration could result in data loss.
Install the PCI-X ServeRAID Controller into your server. Rack the EXP400 with the included rail kit. Connect the VHDCI SCSI cables from the SCSI channel port on the ServeRAID to the ports on the ESM. Be sure to screw the connection in tightly as the "Very High Density Cable Interconnect" has tiny contacts that may not mate well if the cable is not properly secured.


When the server boots, the ServeRAID BIOS will appear. It will search for new drives for up to 6 minutes. You should see the drives start spinning up. If you do not, you probably have a cabling error. Check that the cables are tightly attached to the controller and ESM. Ensure that both ELM's are not attached to the same server AND full-bus mode enabled. Doing so can create target ID conflicts. If you see a configuration error as below, just press F10 to continue. We will adjust the configuration when the OS boots.

Install the drivers and ServeRAID Manager from the included CD (or from the IBM Support Website.) If your server already has an internal ServeRAID controller such as the 6i, you probably have the software installed already as well as the drivers. Launch the ServeRAID Manager:

When the manager boots, with any luck, you will see a list of the unconfigured drives in your attached EXP400. You will likely see several controllers listed in the left pain. Since IBM's ServeRAID 6M is a rebranded Adaptec controller, the software will also pick up Adaptec HBAs in your system. Be especially careful with selecting configured logical drives as they may also belong to the internal ServeRAID 6i controller (probably controlling your boot drives.) If ServeRAID Manager does not see any drives on your 6M, first make sure the drivers are all installed properly and that the 6M appears as an available controller. Then, right click on the controller and select "scan for new or removed ready drives."


After you can see all the disk drives you installed, you will want to create a logical volume. Start the RAID configuration wizard under the 'Actions' menu or by clicking on the "Cylinder" icon in the icon bar. From the first screen, select the "custom" configuration and click 'Next.' Select the drives you want to include in the logical volume and use the ">>" icon to move them into the right column.
You can create spanned RAIDs (like RAID 50) by clicking on the "span arrays" check box.


After the disk selection, you will be prompted to select a RAID level and logical volume size.
Some tips on RAID levels can be found here: http://publib.boulder.ibm.com/infocenter/eserver/v1r2/topic/diricinfo/fqy0_craidint.html

Depending on the RAID level selected, the activity lights on the physical drives may blink for several minutes (or even hours) as the logical drive is created after finishing the wizard.

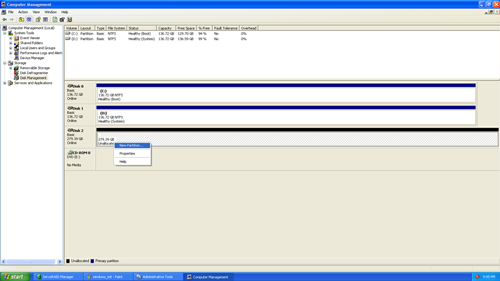
The next step is OS specific. You will need to put a partition table (Windows) or mount point (Unix) with file system on the logical drive in order to use it. This is done the same way as with a regular disk drive. Under Windows, you need to get to the 'Disk Management' plug in (accessible from 'Computer Management" in the Administrative Tools section of the Control Panel.)
Scan for new disks, then initialize the disk by right clicking on the icon with the red exclamation point.


Finally, right click on the newly initialized disk then create a partition. Assign a drive letter, format with FAT or NTFS, and use the new drive as you would any other disk.